Posting this in case anyone else runs into the same issue. It is not exactly obvious how to get AT&T-assigned static IP’s up and running on your own hardware residing behind their Arris BGW210-700 modems. You may encounter it for both commercial and residential use, as they seem to use it for both.
The web interface can be found on port 7270. I did not attempt to get its internal wifi working in my scenario, as I did not want it. So here are the steps I took to get my static assignment functional, as it was not with the default settings.
What I think they intend to have happen with their default configuration is for you to have devices behind your physical switch ports on the modem, which receive public IP’s via DHCP, and are only accessible by way of explicit Firewall -> Packet Filter rules allowing things to reach them. I don’t know this to be the case as I didn’t test, but that is my guess after seeing what all was needed to get traffic to my firewall behind the modem.
Step 1 – Firewall Tab
Short Version:
- Packet Filter – Disable, delete all rules
- NAT/Gaming – nothing to change, delete anything that had been added previously, delete any custom services that had been added previously
- Public Subnet Hosts – delete anything that appears here until you get back to a default warning of ‘Public Subnet Hosts – You must configure a Public Subnet and “Allow Inbound Traffic” must be turned Off to use Public Subnet Hosts.’
- IP Passthrough – on this tab, you want Allocation Mode set to Passthrough. That should lock out all the other fields once saved.
- Firewall Advanced – set everything on this page to Off.
- Parental Control – Disabled
Jump to Step 2 – Home Network Tab section below if you don’t need the long version.
I went through all the sub-tabs here in the Firewall area and disabled all but IP Passthru, including deleting all the built-in rules. Not sure if that was needed, probably not, but it took a while to get this thing working and that was part of it, so you may want to regardless if you’re deploying your own firewall behind this device like I was.
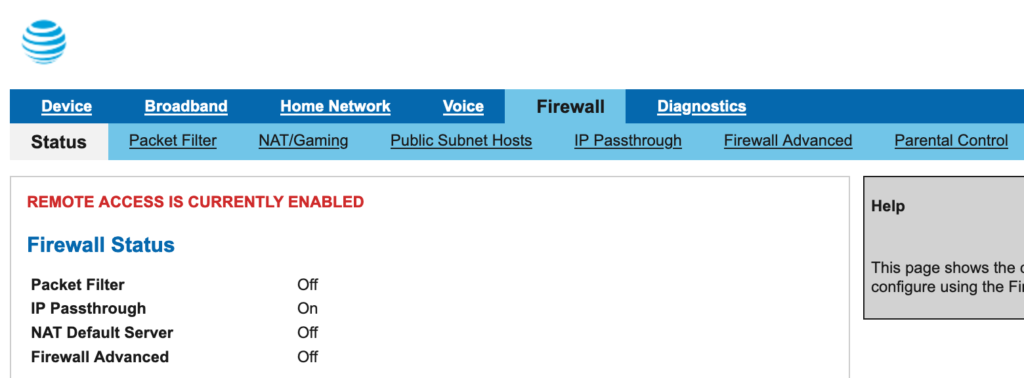
Packet Filter – I deleted all the rules here as I didn’t want to risk anything interfering now or later. The filter itself remains disabled. Same on NAT/Gaming; disable it all, delete anything custom that had been added.
On the IP Passthrough tab, set it to Passthrough and save. It should lock out the remaining options:
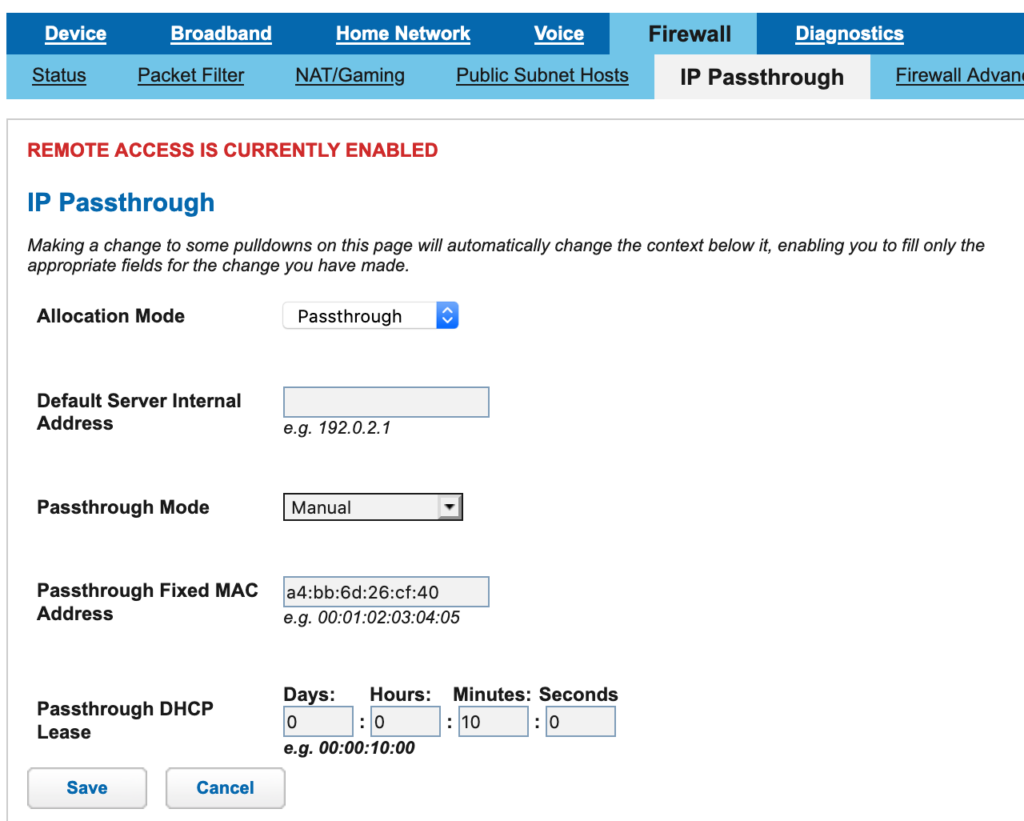
For Firewall Advanced, turn it ALL off since you’ll be putting your own firewall up behind it.

Step 2 – Home Network Tab
First recommendation; if you have no plans to use IPv6, even though you should learn to use it, I’d disable it. There’s no reason to have an additional network protocol active if you won’t be making use of it. In my case, AT&T only assigned a /64. This is annoying, because it means if I did want to use their IPv6 behind my own equipment, I’d have to use non-public IPv6 ranges and then NAT out to an address in the /64 which I’d put on my firewall’s WAN interface.
Next, I turned all the Wifi interfaces off.
Finally, the magical Subnets & DHCP tab. The combination that I finally found to get things working the way I intended was to turn DHCP off, keep public subnet mode on (which it was), set allow inbound traffic on (which it was not). Save. That should then blank out the public subnet DHCP options, leaving you with just your default gateway public subnet IP, assigned by them but I don’t think it matters, and the appropriate subnet mask:
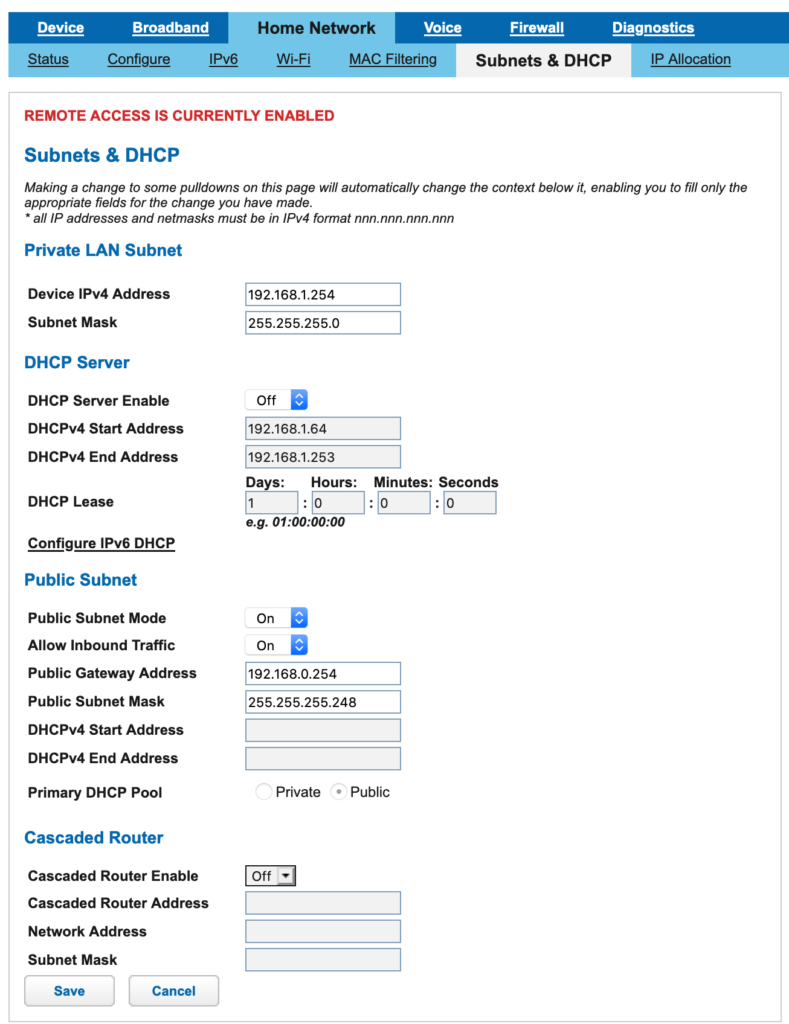
Save those settings and assign your equipment’s external-facing interface one of your public subnet IP’s, set the gateway to the value defined on the page above, and you should be good to go. If you have more than one usable address, you can of course add those to your device as additional IP’s to use for other services.
found this after messing with the EERO and AT&T BGW210 device.
Switching IP Passthrough to Manual > restart router > then on EERO also restart and it detected the new provided ISP IP address range, subnet, and wan router ip.
This is exactly what I needed. Setup worked immediately and exactly as described. You, my friend, are a most enlightened agent of the universe, and I wish you well in all of your future endeavors.